
Picasa is a very helpful photo editing tool that can be used very easily to make a banner. I’ll try to explain all steps in detail, but if there is something that u don’t understand or if I have missed any step, write down in the comments below.
- Before you start, you must have Picasa set up on your computer. You would also need your favourite picture saved on the desktop of your computer. I prefer to use a picture of my own jewelry.
- The picture should be larger than 100 pixels high X 760 pixels wide, else the banner would come out blurred. Set your camera to high picture size before taking the pic.
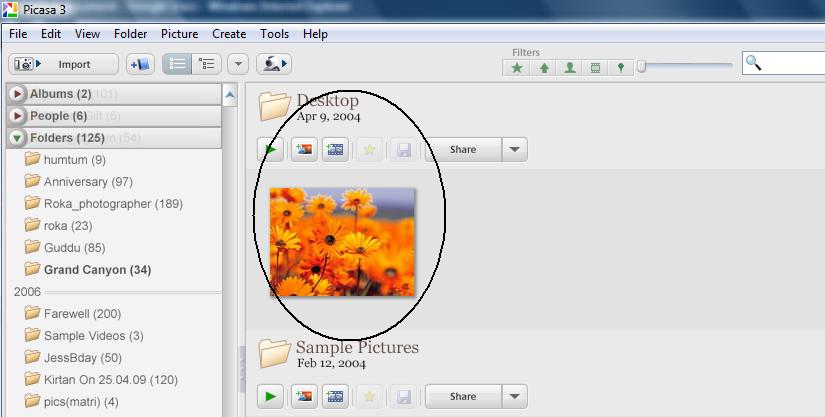
- Open the Picasa application and add your pic to picasa. For this go to file --> add file to picasa. Select your photo from the desktop. I'll be using my favorite flowers photo as an example. The pic will open in the right hand side.
- Double click the pic to open the editing tool. Following window will open, ofcourse with your own picture :-)
- Click on ‘CROP’ in the left hand side panel.
- Select ‘Add Custom Aspect ratio’ from the drop down menu.
- In the window that appears, put the dimensions as 760 x 100. For your reference, you can even put ‘ETSY BANNER’ in the name.
- Select any one of the horizontal selections that come and click ‘Apply’.
- If you want, you can move the selected portion up or down by holding the left key of the mouse and moving the mouse up or down.
- Now select ‘TEXT’ from the left hand side panel.
- Select your favourite font and font size from the drop down menu. I like to use ‘Pristina’ and font size 96. You can also do other style adjustments like Bold, Italics, Underline and alignment. You can also change text color.
- Click anywhere on the picture and print your text there.
- Hover your mouse over the text until u see a small hand and a circle. Hold your mouse over the arrow and you can adjust the size and location of your text by moving ur mouse. Play around with it to find your perfect selection.
- Click on 'APPLY' to embed this text to your picture.
- Your new shop banner is ready. Save it on desktop to upload it to your shop. For saving, click on File --> Save as . Then save it on your desktop or any other favourite location.


Yippie, you just made to your shop banner with your favourite photo and your favourite text. Upload it to your shop like any other banner.
This is awesome, Naiya! Guess I need to get Picasa on my pc. Thanks for doing this! You are wonderful, my dear.
ReplyDeleteDiane
Yes this is very good and helpful I need to set one up. Dorothy
ReplyDeleteThank you Diane and Dorothy.. I am glad that u find it helpful.. Dont hesitate to ask any questions..
ReplyDeleteThis is great! Thanks so much for sharing!
ReplyDeleteI am glad that find it useful :-)
ReplyDeleteNaiya! I spent HOURS today trying to get the jpg from a powerpoint banner to stop looking blurry! OMGosh!! I believe you have saved my sanity!! Thank you so very much!
ReplyDeleteYayyyyyyy... I am glad to be helpful :-)
ReplyDeleteThank you so much for this! Yea!
ReplyDeleteWow so cool, Just used this, Nice and simple. Thank you so much :-)
ReplyDeletethank you!! just used this, and i love my new banner. thank you, thank you!
ReplyDeleteThank you. a further question: how can I make the font solid and not an outline? I've tried everything!
ReplyDeleteAlso, how can I import a font for use on the banner not on the Picassa "text" options?
DeleteThank-you soo much for that I just made my own thanks to you!
ReplyDeleteWOW thanks for the fantastic info - just made my Etsy Shop Banner. this means you are never too old to learn something new.
ReplyDeleteThis was so incredibly helpful. Thank you 100x!
ReplyDeleteNaiya,
ReplyDeleteI have done everything you show in your tutorial and have my banner ready and saved; however, when I go to the etsy page to browse and load it to my shop, nothing happens. Instead of the picture showing up where the browse button is, the browse button remains highlighted and I cannot get my picture to move for loading to etsy. Any suggestions of what I might have done wrong? Just FYI, I am aware of how to browse for pictures as I have done this repeatedly for ebay with no problems. And, since I do not know how to put my name in a profile, I have to show as anonymous. Your or anyone's suggestions will be appreciated. Thank you so much. June
Awesome tutorial. I've been putting this off for several years because I had no clue how to do it. Thank you!
ReplyDeletethank you very much, very helpful.
ReplyDelete